Creating a Channel using Safe
This is an advance tutorial which assumes your knowledge of web3 to be of intermediate level. At the very least, you should be aware of what is a safe, multisig, EOA and smart contract wallets.
While you can use an EOA for creating a channel, that's not the only option.
Channels, on the Push protocol, can also be created using a multi-sig contract. Once created, that contract shall be the owner of that channel and any channel action can be performed after the approval of the required signers of that particular multi-sig contract.
In this quick example, we shall learn to create a channel on Push using a Safe (instead of a simple EOA).
Prerequisites
Before we proceed with the actual steps of connecting the safe to the Push dapp and creating a channel, let's quickly understand the prerequisites:
- Create your own safe with the right set of owners and policies.
- Fund your safe with at least 50 PUSH tokens. This amount of PUSH is required for channel creation.
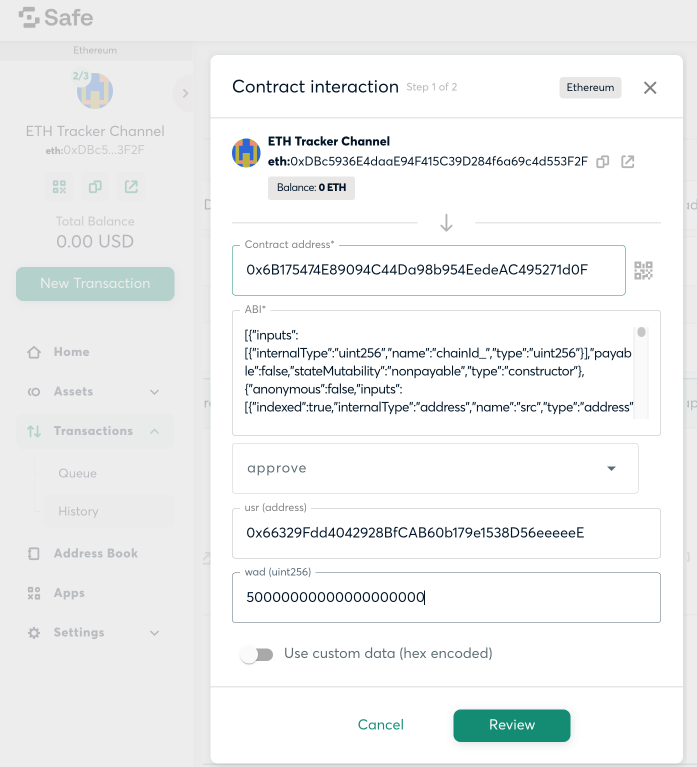
- Initiate a contract interaction from your safe itself to trigger the approve() function of the Push token with the following values for the argument:
spender (address) :0x66329Fdd4042928BfCAB60b179e1538D56eeeeeE - EPNSCore ContractrawAmount (uint256) - 50 * 10^18 PUSH tokens -> Channel Creation Fees
This is important to ensure that the core contract is allowed to use 50 PUSH tokens from the safe for the successful creation of the channel.

Setup
once you have ensured all the prerequisites are completed, let's move forward with creating a channel with the safe using the following steps —
Step 1️⃣ - Connect Push dApp to Safe
a. Open a new tab and goto Push dApp
b. Select Wallet Connect as an option to connect your wallet to the dapp and Copy the connection link. (Keep this link handy as we will use it soon).
c. Open a new tab and go to Safe
d. Once you have connected with your safe on the safe app, go to the apps section at the left sidebar of the safe app.
e. Search for the Wallet connect app and click on it.
f. Paste the connection link (from step b) in the given Wallet connect box.
You should now be connected to Push dapp from Safe. Below is a quick video of the entire process of connecting your safe to Push dapp 👇
Step 2️⃣ - Create the Channel
Now that you are connected to the dapp, creating a channel using a safe is an exactly similar process as it was using an EOA account. Follow this step by step guide to setup your channel.
Step 3️⃣ - Signing and Initiating channel creation transaction
The only difference in creating a channel with safe is the fact that every transaction must be signed and executed on the safe app itself.
Therefore, once the channel details are entered and the transaction is initiated, it's time for the required number of owners to sign and approve this transaction from the safe app to execute it.
After the successful execution of the transaction, your channel will be created on the Push dapp and will be owned by the safe(and its owners).
Remember in order to access the channel's profile page, you must log in to the dapp from the safe itself.